How to Prepare Freeze-Dried Meals

Your next backpacking trip is beckoning - you’ve got the gear, planned the route, done the training, and psyched your kids up for the journey. You’re good to go and you’re planning to keep your pack light by carrying freeze-dried foods to fuel the trek. But you want to make sure you do it right, so your young sidekicks don’t wrinkle their noses at a meal that looks more like gruel than granola.
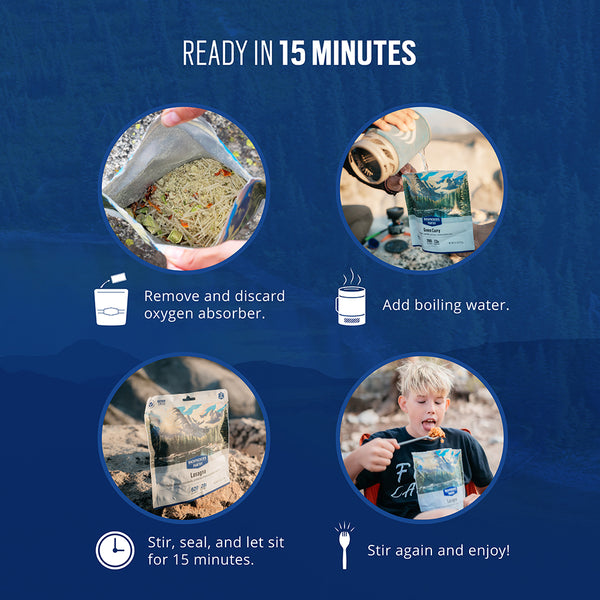
Our freeze-dried meals have been fueling adventures for decades. Here's how to go about rehydrating and preparing our freeze-dried meals. Spoiler alert: it couldn't be easier!
How to Prepare Backapcker’s Pantry Freeze Dried Meals
For every Backpacker’s Pantry meal, whether it’s our famous Pad Thai for a satisfying dinner or our Blueberry Peach Crisp to please your sweet tooth, all you need is water and a little bit of time.
Each meal comes with preparation directions, but they all start with water - boiling or cold, depending on what you’re making. Preparation is simple: add the water per the instructions, stir well, wait the recommended amount of time, give it another stir, and enjoy! The amount of water on the package directions is intended for preparation at 5,000 feet, our home elevation here in Colorado.
Preparation at High Altitudes
If you’re exploring at higher elevations, remember that rehydration time doubles with every 5,000 feet of elevation gain. Long story short, water boils at a lower temp at altitude, but hydration may take longer due to the lower temp of the boiling water. Also, as you go up in elevation, you may be at colder outside temps, which will affect the rate at which the water in the pouch cools.
For example, if you’re making Mango Sticky Rice at 5,000 feet, you need to boil 1 to 1 1/2 cups of water, pour it into the pouch, and let it sit for 15 to 20 minutes. Then voila, a yummy breakfast, dessert, or snack. If you’re up high at 10,000 feet, you’ll need to let the water and rice sit for 30 to 40 minutes.
Conversely, at sea level, where the atmospheric pressure is highest, water boils at 100 degrees Celsius (212 degrees Fahrenheit). Therefore, it may take less time to rehydrate food at sea level than at higher altitudes simply because the water can reach a higher temperature, speeding up the process of rehydration. However, the difference in time may not be significant, and it is always best to follow the instructions and use your judgment to determine when the food has been adequately rehydrated.
Are Backpacker’s Panty Freeze Dried Meals Pre-Cooked?
ANYTHING in our pouches that needs to be cooked to eat is already cooked before it goes into the pouch. Even cold-water hydration of our meals will result in cooked food. We don’t expect cooking to occur in the pouch, just hydration.
How Much Water Do Backpacker’s Pantry Freeze-Dried Meals Require?
Each meal will have the recommended amount of water printed on the pouch. Typically this is between one to two cups. For those who use their water bottle to measure, that's 8-16 ounces, as there are 8 ounces per cup.
How Long Do Freeze-Dried Meals Take to Make?
Convenience is one of the best things about freeze-dried meals, with almost no prep time required. It does, however, take some time to rehydrate and be ready to eat. Each meal will have the time specifically listed on its packaging, but in general, freeze-dred foods take about 15-30 minutes to rehydrate. This time not only brings the texture back to life, but lets the flavors meld into a delicious meal.
Tips For Making Your Freeze-Dried Food
- Don’t add more water than is called for in the packaging directions. The instructions are tested to give you the best results possible.
- If you are adding freeze-dried meats to another entree for an added punch of protein, do so in cold water. Meats rehydrate faster in hot water, so to keep the texture intact, rehydrate in cold water and then add to whatever you’re cooking.
- If you are rehydrating multiple items to combine in a recipe, do so individually and then add them as you would fresh foods.
- Insulate that pouch! If you’re in a cold environment and you’re not using that extra layer that you packed, wrap it around your rehydrating meal to keep it warm and speed up the process.
- Check the corners for extra flavor. Make sure that you stir well before enjoying. This will help spread out the heat and the flavor, making for the most delicious experience possible.
- Get an extra long spoon. There’s nothing worse than leaving those precious (and tasty) calories stuck a spoon’s length away. Avoid this heartbreak by adding a long-handled spoon to your meal kit.
- Get creative with your freeze-dried meals. Add something fresh from home, or even better, foraged from nature (please forage with caution and respect!). Or add some extra protein to keep you full and ready for more adventure. Better yet, don’t let the culinary creativity stop at the pouch; use a freeze-dried meal as the base or side dish for a fun meal. Cuban Coconut Rice & Black Beans with fresh-caught trout? Now you’re speaking our language.


